tel: +1 (800) 996-8617
  • Another DIY 360 Photography Turntable

    High quality professional 360 photography equipment isn’t exactly cheap, so if you are just starting or on a budget and have only a few products to shoot, it might be easier to start with something simple like our DIY 360 photography turntable. Not only we enjoyed building ours, we have been successfully using it in a few dozen of commercial projects.

    Almost the same DIY solution is presented in this video below by ResaleRenegade. It’s a good video with clear instructions – definitely worth watching. This 360 turntable can be even converted into a motorized rotating platform! So consider building your own, export your 360 product images into WebRotate 360 Product Viewer and start generating more business!

  • Host 360 Product Views for Your Clients or Yourself

    In 2019 we have launched PixRiot which is an optimized hosting service for 360 product views. It provides simple drag & drop uploads and sharing using a variety of options, including iFrame. It can be used with all of our plugins and the standard SpotEditor output. Information below is outdated. We suggest using PixRiot instead.

    Here’s a cool new utility for all of our users. Imagine you can have your own hosting service for your 360 product photography and let your clients use your 360 product views by simply pasting a simple YouTube style sharing code onto their pages. Now this becomes possible thanks to a simple sharing script from WebRotate 360 that you can upload online in addition to the actual 360 views like you would usually do with our 360 photography software.

    Checkout this great sample by VIVA Sanitary in UK who use this tool to let resellers show off their innovative bathroom products in a gorgeous 360 degree rotation. Note the small download arrow under the 360 view on the right. If you click on it, there’s the sharing code that can be used on any website to load exactly the same 360 degree spin from VIVA’s website in the same way you would embed a YouTube video on your own webpage.

    Here’s the scoop:
    • Download this new WebRotate 360 Sharing script (as of Dec 22, 2014 it uses our latest release of WebRotate 360 Product Viewer v3.5).
    • Unzip and upload everything somewhere on your hosting server (via FTP for example).
    • Note the location of the file called clientpage.html in the upload and load it in your web browser (i.e. from your web server where it was just uploaded).
    • You will see the usual WebRotate 360 sample shoe – this is pretty much it!

    What you are looking at is a test page with nothing else but the sharing (embed) code. It looks like this:

    <iframe src="viewloader.html?sku=sampleshoe&wd=500&ht=500" width="500" height="500" frameBorder="0" scrolling="no"></iframe>

    Right now this page is still located on your hosting web server / FTP (it’s just a sample) - to actually give this code to your clients to use on their own web pages, all you need to do is change viewloader.html to include the full URL to this file on your hosting server so it would look something like this:

    <iframe src="http://yourhostingsite.com/viewloader.html?sku=sampleshoe&wd=500&ht=500" width="500" height="500" frameBorder="0" scrolling="no"></iframe>

    Then just replace sampleshoe with the name of a folder that you will upload under sharedviews for each of your 360 degree product view – what you upload there under sharedviews is exactly the same single folder that is created on publish via SpotEditor under 360_assets (check this video for more details about publishing and output folder structure).

    You can change width and height to the dimensions of the 360 viewing box that your client will prefer to see on their page or even let them play with these dimensions on their own - the 360 product view will re-scale automatically! Most webmasters will immediately understand what’s going on and appreciate the simplicity of this simple embed code.

    Now you can be your own 360 product photo hosting service for your clients.
  • 360 Photography With Almont Green

    360 photography for African American History Museum

    Here’s an another interesting find – a gallery of studio images from the hemispherical 3D photo-shoot by Almont Green at the museum of African American History in Boston. Just click on the image above to see all of the awesome details at his improvised studio. You see, the hemispherical multi-row photography is a much trickier process than our standard 360 degree spins that you would usually see on the ecommerce websites. And shooting multi-row photography for a major museum is even more challenging since the items cannot be removed from the site and the setup has to be built right there at the museum. Not to mention the responsibility of having to move these items back and forth..

    In this great example, Almont approached the problem by building his custom photo rig with multiple cameras attached to a curvy poll as well as a manual 360-degree turntable. The system captures what we think is 8 rows of 360 degree images (by the number of attached cameras) and each row seems to be composed of 36 images total, judging by the manual markings on the custom made turntable that you see in some of the photos.

    So each individual camera is fixed at its precise angle that was calibrated using the center of the turntable and the hanging weight. Then all of the cameras are triggered (hopefully at once) to capture 8 rows of images for each step of the turntable. The rig looks very light and well-built and seems quite portable. I’m still wondering whether the continuous lights used hot halogen bulbs or the cool daylight ones as there’s a lot of them there and and it can make the work quite uncomfortable if it’s the hot bulbs.

    Also note how Almont arranged the two rows of lights on each stand where one row just shoots straight at the background and the other lights up the object – this is a really portable setup unlike what we used here for shooting on location with a bunch of soft boxes which is a pain!

    All in all this is a masterful execution. The only thing we could recommend would be automating the manual rotation with one of professional robotic 360 photography turntables as they can save a lot of time even with the nice assembly that Almont had in this setup.

  • BigCommerce 360 View Integration Beta 1.0 Released

    Nov 07, 2017 - New BigCommerce integration v2.8 for Stencil based themes has been released. To learn more, visit this page.

    BigCommerce users, rejoice! WebRotate 360 Product Viewer for BigCommerce Beta (DEMO) is now available for download. Best of all, it's free and all your 360 product images (and the rest of the integration files) can be hosted via your own BigCommerce file storage that comes with your BigCommerce plan. Please find the installation instructions and our beta download package below:

    1. Upload

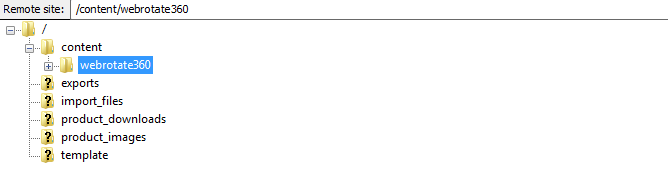
    Download this beta package, unzip, and then upload webrotate360 folder via your BigCommerce FTP under the content folder that you will find in the root of your FTP (you can get your BigCommerce FTP details under Settings->File Access->FTP in the BigCommerce Admin).

    2. Edit styles

    Sign into your BigCommerce Admin and navigate to Design->Template Files. Expand Styles section and open styles.css in the Edit mode and paste the following to the bottom of the css file and save (you can use your own styles for #wr360WrapperId, change viewer width and height, add borders, etc):

    /* WebRotate 360 Config
    ....................................................................... */
    
    #wr360WrapperId{
        width: 400px;
        height: 300px;
        margin: 10px 0 30px 0;
        border: 1px solid #F4F4F4;
    }
    
    .ProductAside .ProductThumbWrap{
        display: none;
    }
    
    div#fancy_outer{
        z-index: 50099 !important;
    }
    
    div#fancy_overlay{
        z-index: 50098 !important;
    }

    3. Edit Product Details template

    Go back to Design->Template Files, expand Panels and open ProductDetails.html in the Edit mode. Paste the following to the bottom of the file and save:

    <link type="text/css" href="/content/webrotate360/imagerotator/html/css/basic.css" rel="stylesheet"/>
    <script type="text/javascript" src="/content/webrotate360/imagerotator/html/js/imagerotator.js"></script>
    <script type="text/javascript" src="/content/webrotate360/wr360hook.js"></script>
    
    <script type="text/javascript">
    
    jQuery(document).ready(function() {
        WR360Initialize();
    });  
    
    </script>

    4. Configure test product

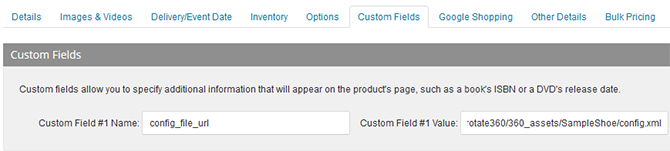
    Open a test product for edit in BigCommerce Admin (Products->View Products) and navigate to the Custom Fields tab. Create a new custom field and call it config_file_url. Add the following as a test value: /content/webrotate360/360_assets/sampleshoe/config.xml

    Navigate to the product page in your webstore and you should see a 360 product spin of a sample shoe in place of the main product image (similar to this one - http://bigcommerce.360-product-views.com/sodling-black-leather-duffle-bag/).

    5. Add your own 360 spins

    If you haven't created 360 views with WebRotate 360 Product Viewer before, you will need to download our free 360 photography software and follow this simple YouTube video guide to create your 360 degree product view first.

    Upload published 360 spins (only those folders that were created by the software under the 360_assets folder) via BigCommerce FTP under contents/webrotate360/360_assets and note the location of the xml configuration file(s) located in the uploaded folder(s). Then just create a custom product field for each product with a 360 view as per above instructions and paste relative xml path into the custom field value and save the changes.

    Here's how your FTP folder structure may look like:

    <BigCommerce root FTP>
      |
      --> content
          |
          --> webrotate360
               |
               --> 360_assets
                   |
                   --> <product1 folder>
                   |    |
                   |    --> <product1 images folder>
                   |    --> <product1 config file>.xml
                   |
                   --> <product2 folder>
                   |    |
                   |    --> <product2 images folder>
                   |    --> <product2 config file>.xml
                   ...
    

    Download BigCommerce Integration and please let us know if any issues!

Subscribe to our newsletter

Sign up to our newsletter to keep a pulse on our latest developments, informative posts and beta releases. We don't abuse it!

Signup