This article is based on our first-hand experience producing thousands of 360 product views at our WebRotate 360 Product Photography Studio.
Camera positioning and product centering
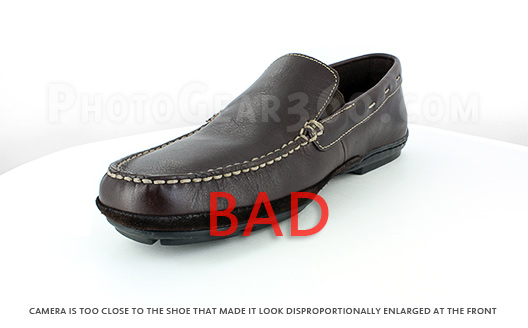
Start by arranging similar products in groups and shoot them in batches to minimize changes to the setup as you progress with your photoshoot. Different products may require shooting from varying distances for best results. As a rule of thumb, never shoot products (except for small items such as jewelry and similar) from less than about 3 feet as the distortion of product shape and dimensions may be too pronounced on the final images. The larger the product the further your tripod and camera should be located. For small electronics such as small speakers, GPS systems, small radios, and similar 3-4 feet would be a good start for your test shots. For larger products such as a small computer desktop or large speakers, the distance between your camera and the product should be close to 5-6 feet or even further.
Quick tip: 50mm or 60mm prime (non-zoom) lens work great with 360 product photography and provide enough crop area for shooting small to medium-sized objects similar to the ones mentioned above.
Camera and turntable have to be properly aligned before placing a product. Good news is that once aligned, the setup would usually stay fixed for a batch of similar products which helps with consistent results and will minimize setup times and image post-production. It’s important to ensure that your camera and the turntable are horizontally aligned against each other and that the camera view center point sits exactly on an imaginary vertical line that goes through the center of the rotation (see more details below).
It also helps making sure that the camera view is perpendicular to the front side of your turntable such that you can then use the turntable side to align your first product shots for each product. That in turn helps with a clean 360-degree product presentation, especially on those 360 frames where product sides show straight and where they will be aligned nicely both vertically and horizontally against the boundaries of your 360 product viewer or a web page in general.
Quick tip: use Pan / Tilt tripod heads as they provide just enough camera movement to properly align your camera. The ball heads make it quite more difficult.
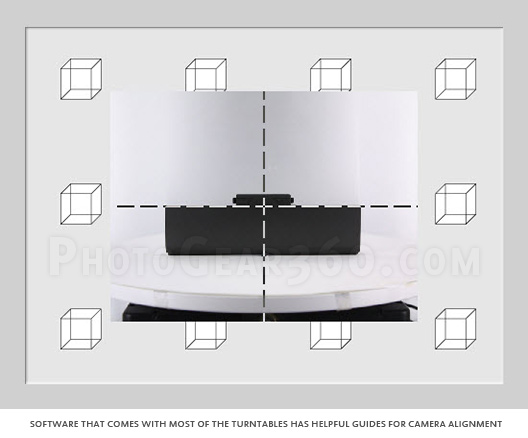
The desktop software included with most popular professional 360 product photography turntables has two perpendicular dashed guides intersecting at the center of the live camera view. These guides help aligning the turntable, your product and the camera. Make sure that the vertical guide goes through the center of the rotating platform of your turntable and the horizontal guide is parallel with the front side of either the table or your product. Also verify that the distance from the left and right edge of the live view to the starting points of your turntable, or your centered product, is the same on each side (see next paragraph for visual explanation).
Quick tip: use a sturdy hardwood desk or a collapsible heavy-duty table to mount your 360 photography setup and make sure it doesn’t sit on a carpet floor as even a slight shift of the table or your camera may require realigning all from scratch.
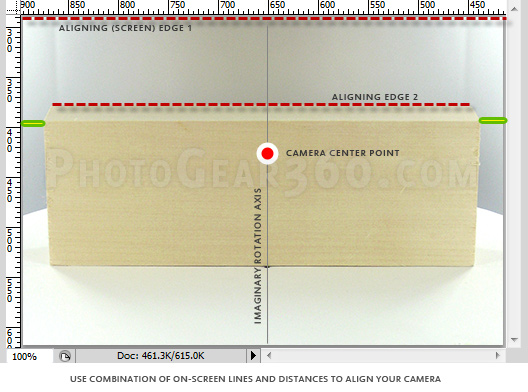
If you are not using the included software (can be the case with our do-it-yourself 360 photography turntable) follow these steps. Place and center a tall rectangular object such as the wooden brick in the picture or a similar item on the turntable positioned for your first product shot, put your camera center point (via viewfinder) at the imaginary line going through the rotation center, then snap a test photo and review the image on your computer screen. The idea is to verify that the top edge of the brick (aligning edge 2 on the image below) is not angled in any way in relation to the top or bottom edge of your monitor screen or your image viewing application (screen edge 1).
Keep adjusting your tripod head until you can see that both edges are parallel, while making sure that the left and right distances from the brick to the image borders (marked green) are equal and that you camera center point is still at that imaginary rotation axis. When you replace the brick with your product aligned for the first 360 shot on the turntable, this would guarantee that the rest of the rotation will be well-balanced.
Quick tip: if not using the Ortery PhotoCapture 360 software that comes with our turntables, you may need to install remote shooting software that usually comes with the DSLR cameras to quickly snap and evaluate your test images on your computer or laptop screen.
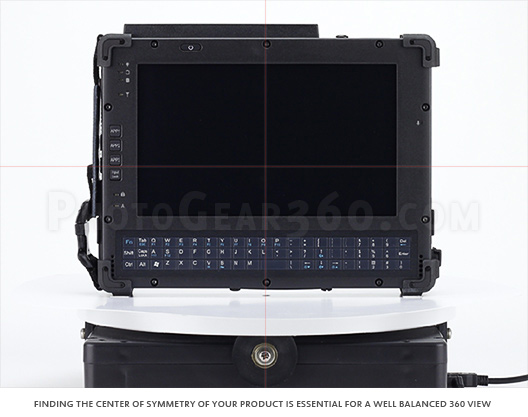
Next step is to center your product. Every product has to be centered when placed on the 360 photography turntable to ensure that the product doesn’t wobble on the final 360 view. Draw two perpendicular lines across the center of the rotation on the platform itself (using a pencil) so that you can align and center your product against these lines before the shoot. To make this reusable, cut a piece of white paper, matching the dimensions of the rotating platform, and then glue it with a double sided tape to the top of the platform. Then find and mark the rotation center on the paper and draw the two perpendicular lines across it. Now you can use these guides for product centering.

You can also try finding some visual guides on the sides of your product to help identifying its natural center of symmetry. Plastic products often have joining lines or marks or screws next to the center that could help positioning it on the turntable. If such marks are not present and you can’t quickly center the product, use a flexible ruler (the soft type used in fashion designs works best) to measure each product side and then align the product using these measurements against the center of the rotating platform and the perpendicular guides you draw in the previous step. The best results are achieved when the rotation center of your turntable matches the center of symmetry of a given product.
The turntable software has the capability to do a quick 360-degree run to verify that your product doesn’t wobble during the test rotation and that nothing is cropped out of the camera view. We recommend to do a test run for each batch of products that share similar shapes and dimensions. If time permits, going through the full set of 360 images and creating a test 360 view is always a good idea. This is relatively painless with the automation that professional 360 photography equipment provides.
Quick tip: wear cotton (antistatic) gloves when working with products that can be easily stained with fingerprints and try not to clean your product until it’s clear how it will be arranged on the set as it takes time to position each product and it will accumulate lint and fingertips the longer you move the product on the set.
We have recently moved all posts from our old photogear360 blog here, so here's some related material you may find useful: